Add, change and save annotations (highlights, notes, stamps, images, ink) in PDF files, from the context menu, keyboard or the Edit PDF toolbar.
Available in version 3.3 or later.
Most often you select text and press
a to highlight it. At a glance:- Highlight:
ahighlights selected text;uunderlines it.Shift + A/Shift + Ualso turn on Edit PDF mode. - Edit PDF mode: toolbar toggle to add, select, and change annotations.
- Highlighter: free-hand marker stroke over anything on the page.
- Copy / cut / paste:
Ctrl + C,Ctrl + X,Ctrl + V. - Undo / redo:
Ctrl + Z,Ctrl + Shift + Z. - Save:
Ctrl + Shift + Ssaves into the PDF.
Highlight text #
Select text and press
a. This creates a yellow highlight annotation: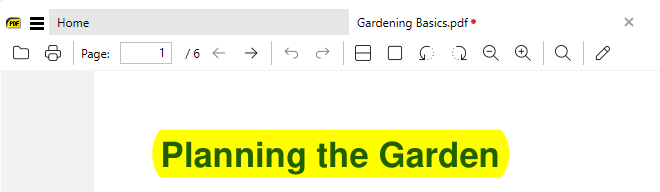
Here the title was selected and highlighted with
a. The red dot after the file name in the tab shows that the document has unsaved changes.Other annotations you can create from a selection (right-click → Annotations → Create From Selection):
- highlight
- underline
- strike out
- squiggly underline
- redact
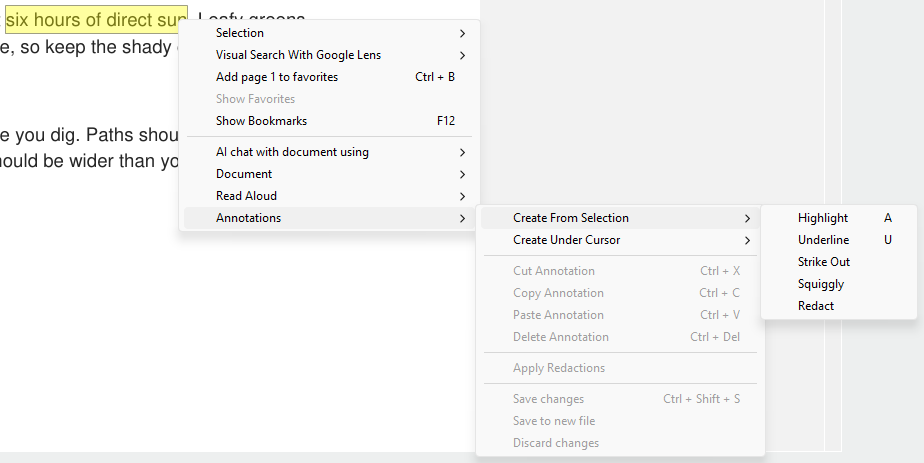
The selected text is also copied to the clipboard, so you can, for example,
Ctrl + V it into the annotation’s Contents property.Turn on Edit PDF mode #
- Toolbar: Edit PDF button in the main toolbar.
- Keyboard:
Shift + A/Shift + Ucreate a highlight / underline (likea/u) and turn on Edit PDF mode. - Command Palette:
Ctrl + K, thenToggle Edit PDF(CmdToggleEditPDF).
The annotation tools show in a second toolbar row:

Find an annotation #
Find Annotation, near the end of the Edit PDF toolbar (before the Save button), opens a floating Annotations window: a search box (
filter N annotations) over the list of the document’s annotations. Press it again, or close the window, to hide it. Also Ctrl + K, then Find Annotation (CmdFindAnnotation).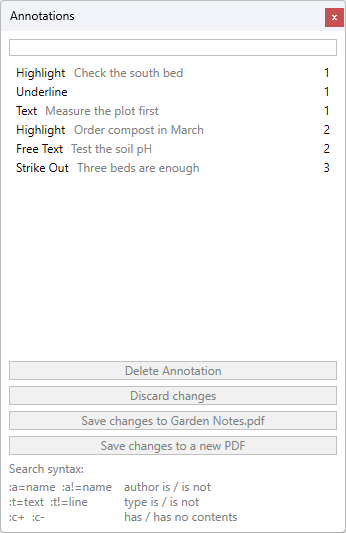
Add an annotation at the mouse #
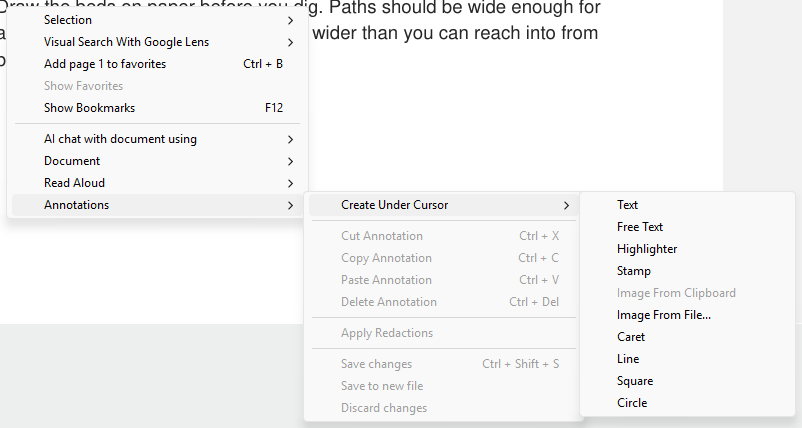
Right-click → Annotations → Create Under Cursor creates an annotation at the mouse location:
- text
- free text
- highlighter
- stamp
- image from the clipboard
- image from a file (
Image From File...) - caret
- line, square, circle
Add a signature image #
To put a picture of your signature (or any other image) on a PDF page:
- right-click the page → Document → Insert Image…, or
- right-click the page → Annotations → Create Under Cursor → Image From File…
Pick a PNG (or JPEG, etc.). The image is stamped on the page and you can drag or resize it. Save with
Ctrl + Shift + S or the Save button of the Edit PDF toolbar (see Save annotations to the PDF). See also Add an image to a PDF.Note: this is an electronic signature image, not a cryptographic digital signature (right-click → Document → Sign Document…, see Sign a PDF; it uses a certificate from the Windows store or a
.pfx / .p12 file). Sign Document can also draw a PNG or JPEG inside the digital signature itself, and you can turn off the “Digitally signed by” labels and the other lines.Paint with the Highlighter #
The Highlighter is a marker pen: drag on the page and it paints a wide translucent stroke wherever the mouse goes, over pictures and blank areas as well as text. The selection-based Highlight (
a) still needs text to attach to.Start it with:
- Toolbar: Annotations toolbar.
- Context menu: right-click → Annotations → Create Under Cursor → Highlighter.
- Command Palette:
Ctrl + K, thenHighlighter(CmdAnnotationHighlightBrush).
Drag to paint, release the mouse or pen to finish,
Esc to cancel. Closing the hint at the bottom of the window also finishes polyline. The stroke keeps a constant on-screen width while you draw, whatever the zoom.Ink is the same on a tablet: release commits that stroke and the tool stays selected so you can draw another.
Esc or closing the hint leaves the tool.The stroke is saved as an ink annotation in the
HighlightColor from Advanced Settings (yellow by default) at 40% opacity, so you can move, recolor, or delete it like any other annotation.Change an annotation #
Click an annotation in Edit PDF mode to select it. A compact property row appears under it (color, opacity, border, font, icon, line endings, Contents). A file attachment’s row starts with Attach File, and Save Attachment once a file is embedded. Icon, line-ending, and text-alignment menus show the glyph next to the name. The filter list and floating list also select an annotation when you click a row.
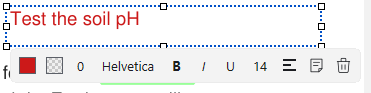
Outside Edit PDF mode, click a file attachment whose file Sumatra can open (a PDF, for example) to open it in a new tab. Use Save Attachment on the page context menu to write it to disk.
Move an annotation #
In Edit PDF mode, left-click an annotation and drag it. This works for a selected shape annotation too (including polygon, polyline, and ink).
Delete an annotation #
Select it and press
Delete (or press Delete with the mouse over it), or use Delete Annotation in the floating list.Copy, cut and paste annotations #
Ctrl + Ccopies the selected annotation.Ctrl + Vpastes a copy with its top-left corner at the mouse. You can paste on another page, or into another PDF.Ctrl + Xcuts: it copies the annotation under the cursor (or the selected one, likeDeletedoes) and the original is deleted when you paste, so nothing is lost if the paste doesn’t happen. Only the first paste moves the annotation; pasting again makes copies.- Copy and Paste are also on the page context menu and in the command palette.
Note: only annotations that can be moved can be copied. Text markup (highlight, underline, squiggly, strike-out) is anchored to the text it covers, so it can’t be copied and pasted elsewhere. Neither can file attachments, whose embedded file isn’t copied.
Undo and redo #
Ctrl + Z takes back the last change to the PDF, Ctrl + Shift + Z re-applies it. The Undo and Redo buttons on the Edit PDF toolbar do the same and are greyed out when there is nothing to step to.One gesture is one step: creating an annotation also sets its color, size and contents, and a resize drag rewrites it as the mouse moves, but a single
Ctrl + Z takes all of it back. The history covers everything that changes the document, not just annotations, and goes back to the state the file was opened (or last saved) in — undoing every change makes the document count as unmodified again.Save annotations to the PDF #
With unsaved changes, the document’s tab shows a red dot after the file name.
| Action | Shortcut / command |
|---|---|
| Save annotations to file | Ctrl + Shift + S (CmdSaveAnnotations), the Save button at the end of the Edit PDF toolbar, or right-click → Annotations → Save changes |
| Save to a new PDF | CmdSaveAnnotationsNewFile (the Save button’s drop-down, tab context menu, right-click → Annotations → Save to new file, or command palette) |
| Discard unsaved changes | CmdDiscardChanges (tab context menu Discard changes, or Ctrl + K, Discard Changes command in Command Palette) — reloads the file from disk |
| Save when closing | Prompt dialog — choose existing file, new file, or discard |
Hover over the Save button on the Edit PDF toolbar for a drop-down with Save changes to followed by the file name, Save changes to a new PDF and Discard changes. They are greyed out while there is nothing to save.
When you close the document (or exit the app) with unsaved annotations, SumatraPDF asks if you want to save them:
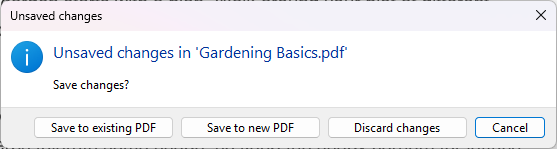
Save to existing PDFoverwrites the PDF with the newly added annotations.Save to new PDFsaves as a new file.Discard changesloses the annotations.Cancel, or closing the dialog, keeps the document open.
Tips #
- Save with
Ctrl + Shift + Sbefore closing to skip the save prompt. - Use Discard Changes (
CmdDiscardChanges) to drop unsaved work without closing the tab. - Use
Shift + Ato highlight and enter Edit PDF mode in one step. - Use
Ctrl + XthenCtrl + Vto move an annotation to another page or PDF. - Set
HighlightColorto#80ffff00for half-transparent highlights.
Set default colors, size, and opacity #
Open Settings → Advanced Settings… and edit the
Annotations.* settings (or the Annotations block in the settings file, via Open Advanced Settings File…):| Setting | Used for |
|---|---|
HighlightColor |
New highlights (a) — default #ffff00 |
UnderlineColor |
Underline annotations |
SquigglyColor |
Squiggly underline |
StrikeOutColor |
Strike-out |
FreeTextColor / FreeTextBackgroundColor |
Free text annotations |
FreeTextSize |
Default font size for free text (default 12) |
FreeTextBorderWidth |
Border width for free text |
FreeTextOpacity |
0–100 percent opacity for free text |
TextIconColor / TextIconType |
Sticky-note style icons |
DefaultAuthor |
Author name written into new annotations |
Highlight, underline, squiggly and strike-out colors accept
#aarrggbb so you can set a default opacity: #80ffff00 is a half-transparent yellow highlight. #rrggbb (6 digits) is fully opaque. You can still change one annotation’s opacity from the compact property row.Free-text opacity is the separate
FreeTextOpacity percent (0–100).See Advanced settings for the full list.
Keyboard shortcuts with custom colors #
Ver 3.6+:
CmdCreateAnnotHighlight accepts a color argument. You can bind e.g. green highlights to a key — see Customize keyboard shortcuts.Toolbar buttons #
Add annotation commands to the toolbar via the
Shortcuts array — see Customize toolbar. Example commands: CmdCreateAnnotHighlight, CmdCreateAnnotUnderline, CmdSaveAnnotations.Annotations from other programs #
SumatraPDF can display most standard PDF annotations created in Acrobat, Foxit, etc. Some proprietary annotation types may show only an icon. Free-text presets and appearance vary between editors.
See also #
- Customize keyboard shortcuts — bind annotation commands, e.g. colored highlights
- Customize toolbar — add annotation buttons
- Advanced settings —
Annotationsdefaults - Keyboard shortcuts — all annotation keys